Guides & How To's
Our How To Guides
Here at Semper Fi Printing we feel the more you know the better! So we have put together several "how to" guides to help you better understand the world of printing. These guides are designed to make everyone's lives better and easier when putting together their next print project. Have a question or suggestion you don't see below? Feel free to give us a call!
"Quick, what is the best format for my files that I should send you?"
The quick and dirty of what we need is simple: 300dpi, 1/8" bleed, saved in CMYK, no crop/bleed marks PDF. This combination applies to about 90% of all projects that come our way. Of course if you have any questions please feel free to contact us. However we highly recommend you glance through the guides below to get a better understanding of what this information means and how to go about setting up your files for the best chance for the least amount of issues come printing time.
Our Guides
Sizing
Bleed Area
Bleed is the extension of print past the trim lines. When the artwork extends to the trim line, bleed is added to extend it past the trim marks. This eliminates a thin white line that can appear along the edge after trimming. If your artwork extends to the trim lines, extend any background colors and design elements past the line, to create bleed.
Not all print jobs needs bleed. Double-check to see if you need bleed, or ask us if you are unsure.
Trim Area
The trim area is the finished size. The print is cut along these lines, but due to slight registration shifts between sheets, the artwork can shift a little. The difference may only be 1/32", but it could also be 1/8". This is why it is important to keep your text and images within the safe area.
Safe Area
The safe area should contain all of the artwork, with the exception of any bleed. The safe area helps to ensure that any important information doesn't get cut off. All important information such as names, phone numbers, and logos should always be inside the safe area. This will ensure that they aren't cut off when your print is trimmed.

Color Modes
RGB Color Mode
RGB represents Red, Green, and Blue. Screens and monitors use combinations of these colors to display all the colors you see on screen. For on screen viewing, RGB is the recommended color mode. If the art is going to be printed, be sure to switch it to CMYK.
CMYK Color Mode
CMYK represents Cyan, Magenta, Yellow, and Black; the four process colors. CMYK is used for print production as printers use a combination of these four colors to create the various colors you see in print. Artwork should always be in CMYK for print. If the artwork is strictly for on screen viewing and won't be printed, use RGB mode.
Blacks
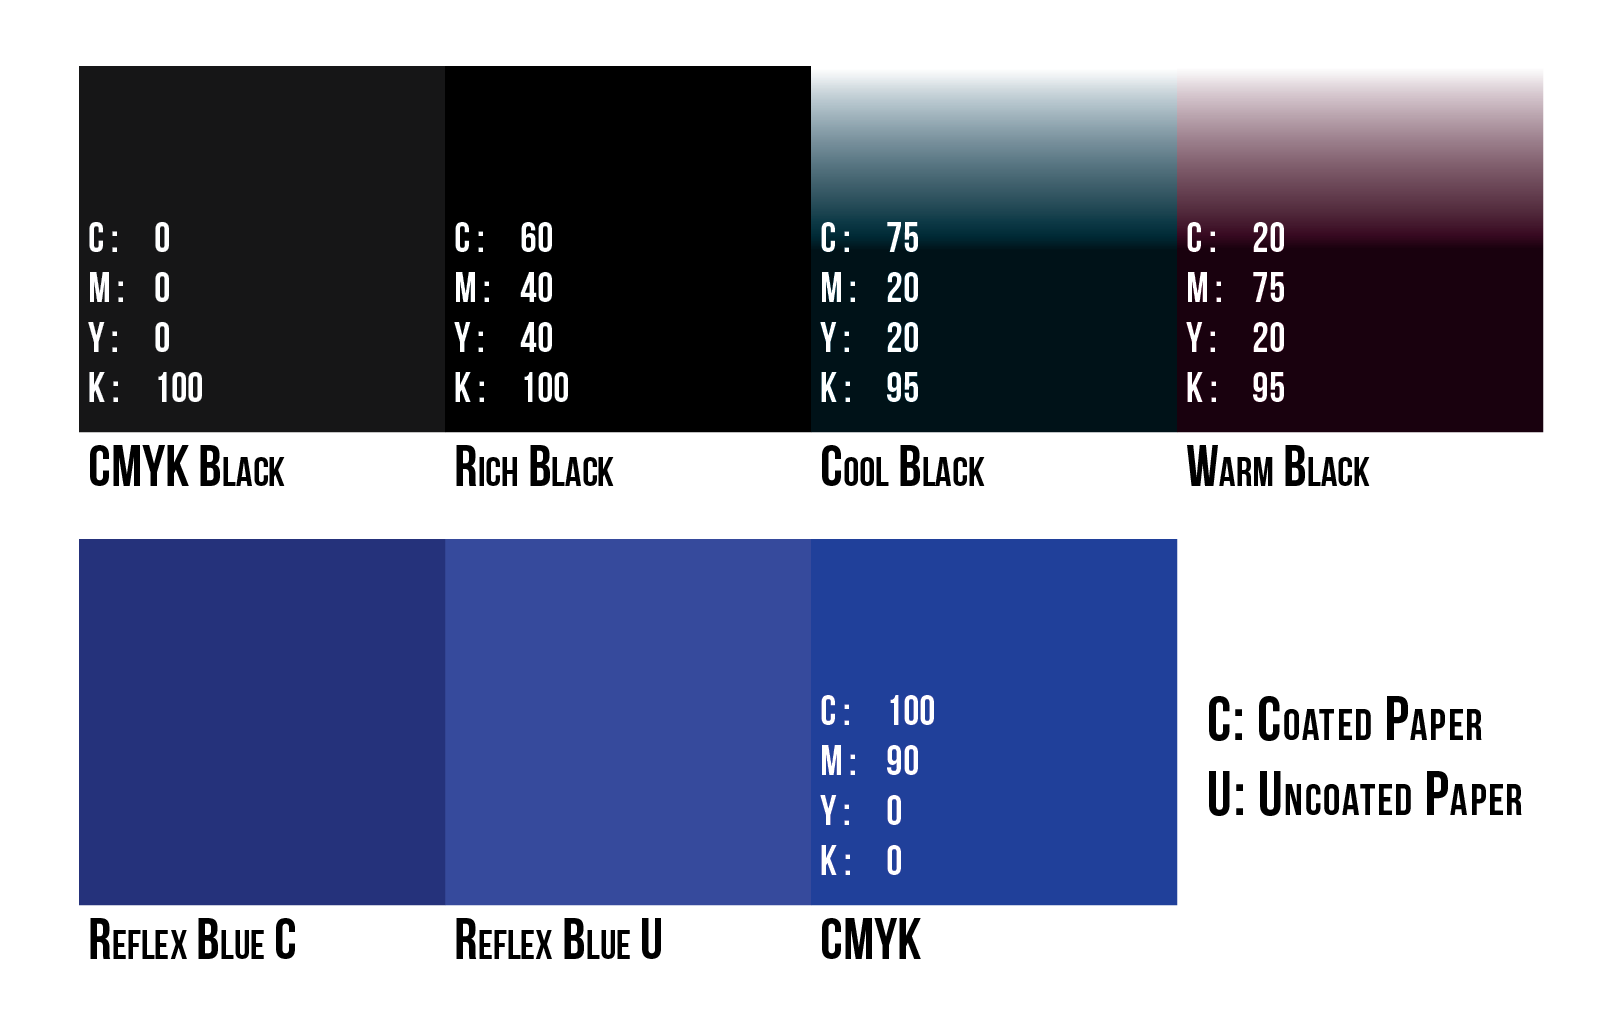
There are two different blacks used in print. Blacks can be CMYK Black or Rich Black. CMYK black is sometimes referred to as plain black, or true black. CMYK Black is composed of purely 100% black. Rich black is composed of 100% black, as well different values of cyan, magenta, and yellow (we use 60 40 40 100). The percentages for pure black can vary. Some have more cyan to create a cooler black, while others have more magenta to create a warmer black.
Spot Colors
Spot colors or PANTONE ® colors (PMS colors) are created through the use of specifically colored inks. Spot colors are unique in that they will always be exact. Reflex Blue for example, will always look the same no matter where it is printed. While they have the advantage of perfect color matching, spot colors can only be run on a traditional offset press with special plates, and therefore are very expensive when running small quantities. CMYK values can be used to create a similar color, but they won't be an exact match. The difference is usually very minor, but when color matching is essential, spot colors should be used.
Spiral Binding
Coils
Spiral Binding is a perfect way to create professional presentations, notebooks, manuals, and more. We offer spiral binding in both plastic and metal coils. We have a huge selection of colors and sizes for plastic coils. If you're looking for a professional look or more durable binding, metal coils are perfect.
Covers and Backs
A great way to may your spiral bound booklet stand out further, is by adding custom covers and backs. Whether you want clear covers, UV coated covers, or leather grain backs, we can make your booklets as unique and custom as you want.
Mailing
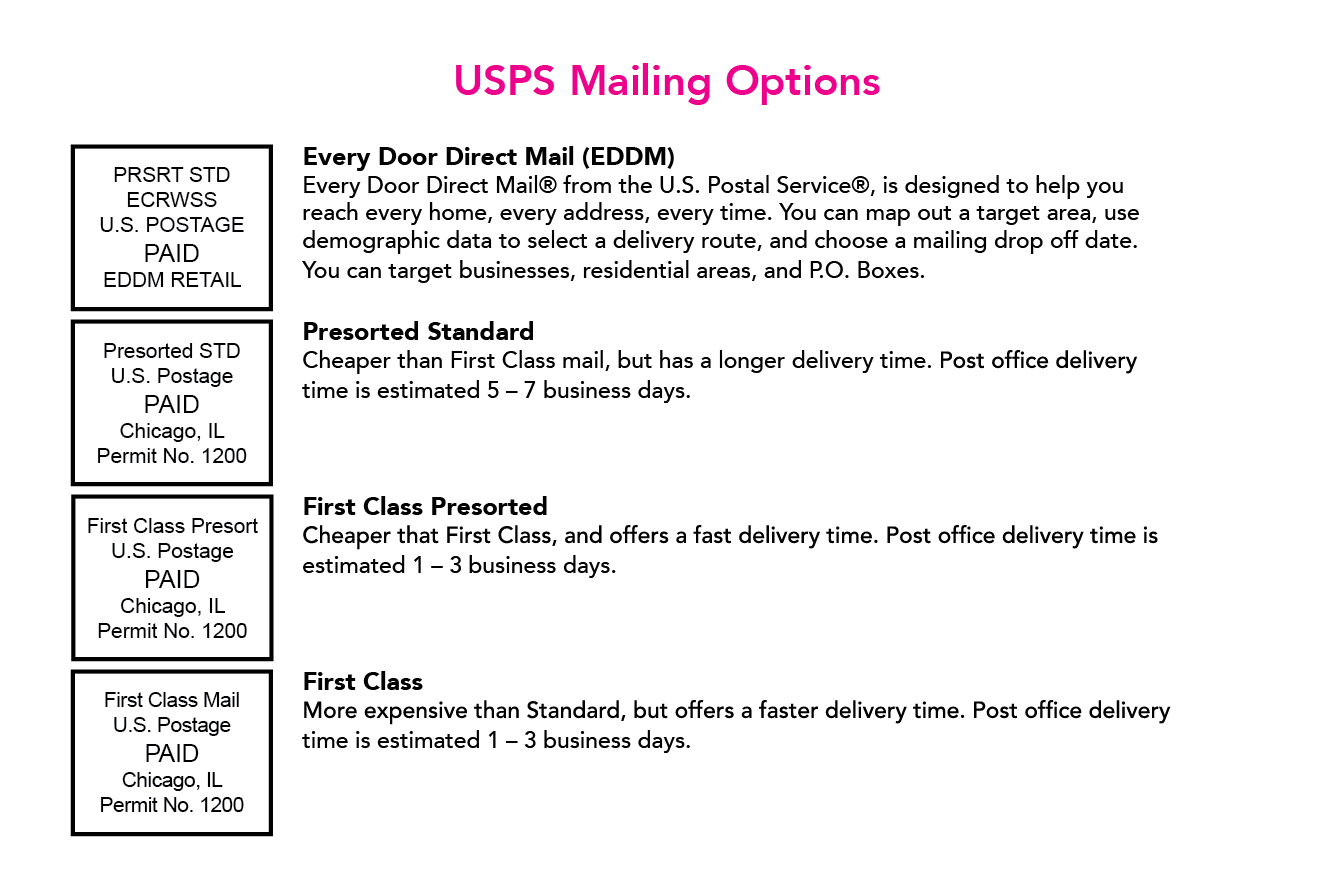
USPS Automation
Our services are designed to take advantage of postal savings by ensuring a mailing is "automation compatible" for the U.S. Postal Service. This status reduces processing time for the postal service and results in lower mailing rates. Just give us your mailing list, and we will do the rest.
Shipping and Fulfillment Services
We offer shipping and fulfillment services that are fast, easy, and hassle free. Simply drop off your package and provide the destination, and we'll do the rest. We can even box it for you.
Creating a PDF
When exporting a .pdf, the default preset may not have all of the necessary options checked. Here is a essentials checklist for exporting:
PDF/X-4:2010*: Using the most recent version will help to ensure that transparencies and colors display correctly (*year may not be 2010).
No Spreads: All artwork should be saved as individual pages. A two sided business card for example, will be a two page .pdf.
Bleed: If your file has artwork extending to the edge, make sure that the bleed settings (not bleed marks) are set correctly.
Crops: We add our own crop marks, so no marks need to be added.
Fonts: All fonts used should be expanded or outlined prior to exporting. This will prevent font issues when printing.
Images: All images should be embedded into the file, not linked.
Benefits
The biggest benefit to a PDF is that if created correctly, everything will be self-contained and "locked in." It also has the benefit of being the only file you need to send to your printer. In most cases, this is the best option for sending your files to a printer.
Limitations
The main limitations to a PDF are a lack of editing options. Typically, it is much more difficult to make changes to the PDF file. Usually if edits need to be done, it is best to go back to the native file, make the changes, then export a new PDF.
Providing Fonts & Files
Saving and sending your fonts with your native document and linked graphics is another method of ensuring your piece prints as you intended. It can be a bit tricky for the novice user, though many softwares offer "packaging" functions which makes the process much easier.
InDesign
Adobe InDesign comes with a function which will review your file and collect all the fonts and graphics used into a nice, orderly folder. You will find this function under the File menu header. File -> Package... This will walk you through the process and give you options on what to collect and where to save the files.
Illustrator
Adobe Illustrator also comes with a function which will review your file and collect all the fonts and graphics used into a nice, orderly folder. You will find this function under the File menu header. File -> Package... This will walk you through the process and give you options on what to collect and where to save the files.
Others...
Adobe Photoshop and other programs do not always have a nice, easy package function. In these situations, you will need to manually copy over any fonts used in the document. First, make a list of all the fonts you used. Second, create a folder on your desktop. This is where you will put copies of your fonts to be sent to the printer. Third, locate the folder on your computer where your fonts are stored (this will be different depending on which platform - Mac or PC - and which operating system you are using). Finally, copy and paste the needed fonts from your computer's font folder to the folder your created on the desktop. Be sure to copy and paste the fonts - do not just move them! This will result in the fonts no longer being available in your programs because the computer doesn't know where they are any more.
Benefits
This method, if done correctly, helps ensure that the fonts will be the exact ones the file was created with and will display correctly. Since you are also sending the native file and graphics, it also allows for the file to be freely edited as needed.
Limitations
In this case, the limitations are due to the knowledge and experience of the user. It can be tricky to locate and copy the correct fonts if you've never done it before or don't know where to look.
Outlining/Expanding Fonts
Expanding or Outlining your text changes it into a graphic. This removes the need for the font entirely. Now it is a graphic and no longer a font. Many programs offer this option. There is no difference between "Expanding" and "Outlining" text. They are interchangeable terms and different programs use either term. A few of the main programs are below.
InDesign
Adobe InDesign comes with a function which allows you to select text and convert it to a graphic. There are two methods.
1) Use the Selection Tool to click on a text box. Click on Type in the menu header. Scroll down and select Create Outlines. InDesign will convert all of text in that box into a graphic.
2) Use the Type Tool to highlight a portion of the text within a block. Click on Type in the menu header. Scroll down and select Create Outlines. InDesign will convert only the selected text into a graphic which is nested inside the text box.
Illustrator
Adobe Illustrator comes with a function which allows you to select text and convert it to a graphic.
1) Use the Selection Tool to click on a text box. Click on Type in the menu header. Scroll down and select Create Outlines. Illustrator will convert all of text into a graphic.
Benefits
Once the text is converted to a graphic, there is no longer a need to provide the fonts. The text will be treated the same as any other graphic.
Limitations
The text is now a graphic. It is no longer selectable as editable text. For all intents and purposes, the original text is gone and a vector outline graphic is now in its place.
Saddle-Stitch Booklet Setup
For setting up booklets, magazines, or catalogs that will be saddle-stitched, we need one of the following file types:
PDF File
All fonts should be outlined or expanded.
All images should be embedded.
File should be saved in CMYK format with no spot colors. (Let us know your PMS colors and we'll do our best to match them)
The booklet should be saved as single pages in order, not spreads.
There should be a minimum of 1/8" bleed setup on each side.
InDesign
Package the file.
Packaging the InDesign file will create a folder with all the included images and fonts of that file making it quick and easy for others to work off an existing file. You will find this function under the File menu header. File -> Package... This will walk you through the process and give you options on what to collect and where to save the files.
Illustrator
Adobe Illustrator also comes with a function which will review your file and collect all the fonts and graphics used into a nice, orderly folder. You will find this function under the File menu header. File -> Package... This will walk you through the process and give you options on what to collect and where to save the files.
If you are using an older version of Illustrator which does not include the Package option, create a folder and place all used fonts and graphics into that folder.
We prefer print-ready PDF files, but if you are unsure or have any concerns about the setup, send us the InDesign or Illustrator files. We prefer InDesign files over Illustrator files if possible.
For booklets, the total number of pages must be a multiple of 4. If your book is not a multiple of 4, blank or additional pages must be added.
Sell Sheet/Flyer Setup
For setting up sell sheets, flyers or any other single/double sided sheet that has no folding, we need one of the following file types:
PDF File
All fonts should be outlined or expanded.
All images should be embedded.
File should be saved in CMYK format with no spot colors. (Let us know your PMS colors and we'll do our best to match them)
The booklet should be saved as single pages in order, not spreads.
There should be a minimum of 1/8" bleed setup on each side.
InDesign
Package the file.
Packaging the InDesign file will create a folder with all the included images and fonts of that file making it quick and easy for others to work off an existing file. You will find this function under the File menu header. File -> Package... This will walk you through the process and give you options on what to collect and where to save the files.
Illustrator
Adobe Illustrator also comes with a function which will review your file and collect all the fonts and graphics used into a nice, orderly folder. You will find this function under the File menu header. File -> Package... This will walk you through the process and give you options on what to collect and where to save the files.
If you are using an older version of Illustrator which does not include the Package option, create a folder and place all used fonts and graphics into that folder.
Photoshop
Send us your file with active layers (not flattened). This will allow us to make changes as needed. If you have any linked smart objects, please include them in an images folder as well.
We prefer print-ready PDF files, but if you are unsure or have any concerns about the setup, send us the InDesign, Illustrator, or Photoshop files.
Variable Data Setup
For setting up a print job that will have variable data, we need the following files and/or file types:
PDF File
A version that is blank where any variable data will be inserted.
A version that has a sample input of the variable data for position and appearance.
An spreadsheet file with all variable data information with categories separated by columns.
The font, font size, and color (CMYK values) for the variable data text to be inserted.
All fonts should be outlined or expanded.
All images should be embedded.
File should be saved in CMYK format with no spot colors. (Let us know your PMS colors and we'll do our best to match them)
The booklet should be saved as single pages in order, not spreads.
There should be a minimum of 1/8" bleed setup on each side.
InDesign
Package the file.
Packaging the InDesign file will create a folder with all the included images and fonts of that file making it quick and easy for others to work off an existing file. You will find this function under the File menu header. File -> Package... This will walk you through the process and give you options on what to collect and where to save the files.
Illustrator
Adobe Illustrator also comes with a function which will review your file and collect all the fonts and graphics used into a nice, orderly folder. You will find this function under the File menu header. File -> Package... This will walk you through the process and give you options on what to collect and where to save the files.
If you are using an older version of Illustrator which does not include the Package option, create a folder and place all used fonts and graphics into that folder.
Photoshop
Send us your file with active layers (not flattened). This will allow us to make changes as needed. If you have any linked smart objects, please include them in an images folder as well.
We prefer print-ready PDF files, but if you are unsure or have any concerns about the setup, send us the InDesign, Illustrator, or Photoshop files.
Spot UV/Foil Setup
How to setup files for Spot UV/Foil
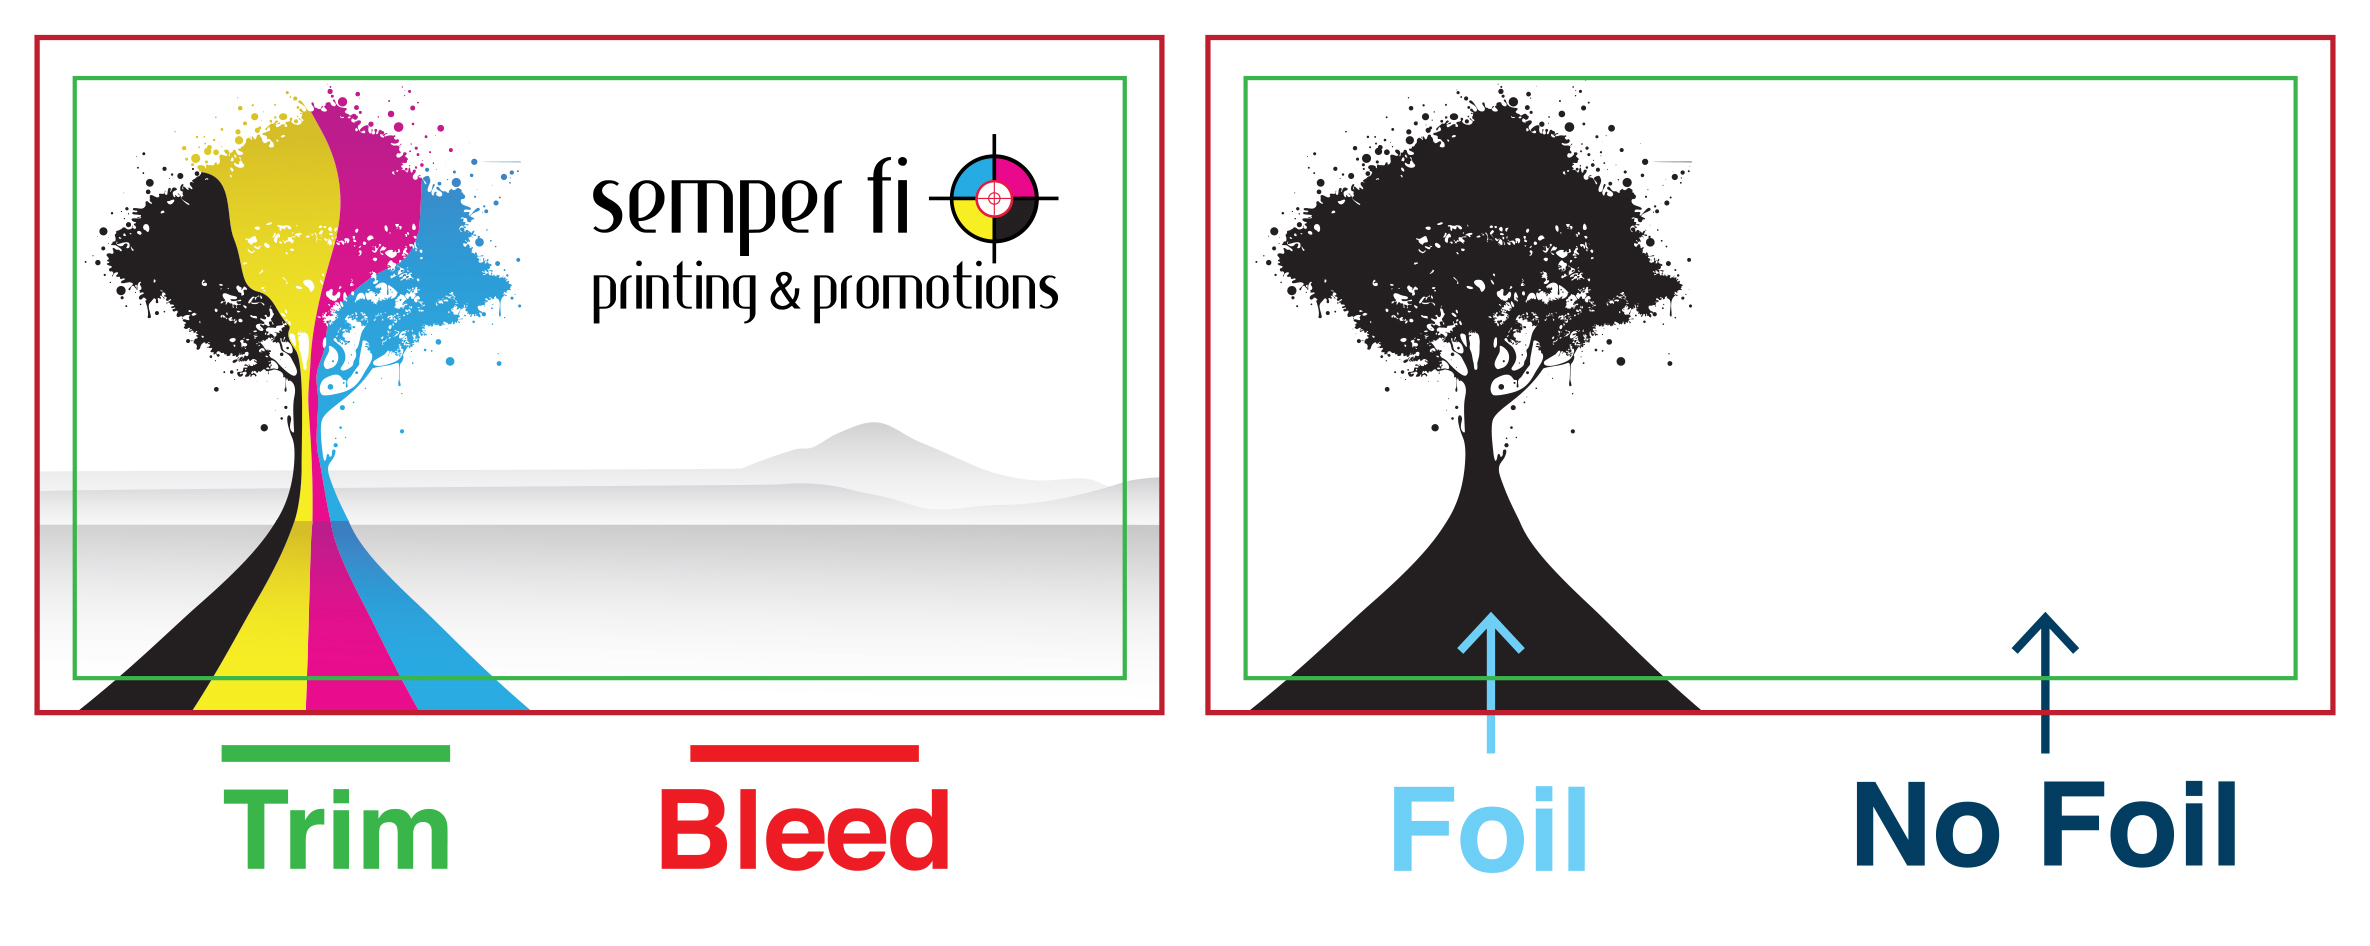
File setup for both Spot UV and Foil is actually exactly the same. It's also the same for all creative programs (InDesign, Photoshop & Illustrator). The process is relatively simple. Once you have your artwork setup, you want to create a new layer above the rest and on this layer add the design/portions that will be covered in the spot UV/foil (as seen below). The key thing to remember when creating this new layer is that the artwork must be in 100% black. Then when saving out the PDF to send to us, you want to make sure that the spot UV/foil is on it's own separate page. So, for example, on a 2-sided business card with spot UV/foil on one side, you will have 3 pages: front, back and a spot UV page.
What is resolution?
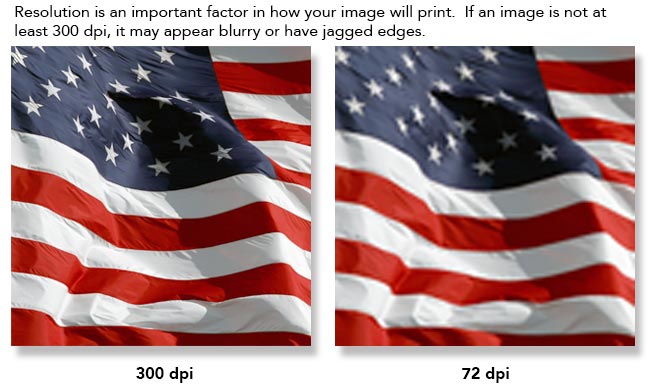
The resolution of the file, and images used within, is very important when coming to the quality of the final printed product. If it is too low you will get blurry/pixelated images (as you see below). Generally you want to make sure you never using any image or saving any file out at anything lower than 300dpi/ppi. Sometimes you can slightly get away with lower resolution images if you are using a large image and scaling it down. Make sure to note the opposite is not the same. You can not take a 300dpi/ppi image and scale it up. Scaling images up will lower the native resolution.
